Tourte lorraine au poulet et à la marjolaine (chicken marjoram pie)

DSC06777-001

Une tourte lorraine. Lorraine style meat pie. I’ve never seen my mother making one, but so many local butchers proposed great ones, even without orderning.
Here I have to make it from scratch. This time, it’s a little variation to adapt to local ingredients.

DSC06828-001

Inside it’s mostly chicken…

DSC06905-001

… and a few herbs, particularly fresh marjolaine (marjoram).

DSC06786-001

Humm… the crispy and buttery golden crust.

DSC06798-001

For dessert : small lunettes à la vanille made with the same pastry.

vanilla spectacles

And some escargots (snails), no photo of todays but you’ve seen some before :

schnek (escargot)

DSC06793-001

My dairy free diary

I hope that can give ideas to anyone needing to replace dairies from their diet, or just looking for new flavors. Here is my guide book.
It’s about variations. So, no, I’m not renouncing to the wonderful French cheeses. I eat less dairies than I used to for a number of reasons.
I am not going to make you a list of the infamous industrial recreations, margarines and blocks of soaps marketed as cheese. I don’t find those products interesting. They are extremely processed, and not even cheap.
I found or rediscovered many cousins of dairies, mostly plant based cousins. Cheese-less dishes are not less good nor better than the others. They are different, new dishes. Don’t compare !
Disclaimer : I tried to organize it by ingredients (soy, coconut, millet, sesame, oil… and by use as “subs” (cottage cheese, cream, butter, stinky cheese, runny cheese…), and… you get that confusion ! Sorry, it’s a random mix. The topic is so vast…


PLANT MILKS

Soy milk : It’s thicker and richer than milk. The drink you buy is diluted and sweetened, so to reproduce just add sweetened water to the “whole” soymilk. You can use it as a drink, as ingredient and also to make tofu or yuba.
DIY soy milk
tonyu milky cake
French-Chinese milky chervil soup

Almond milk :DIY almond milk

Corn milk : DIY sweet corn milk

Hemp milk : I didn’t find the one I made was good raw. Well, I make it from whole hemp seeds, maybe if they are hulled it’s different. But it’s delicious cooked.
hemp milk quiche
spouted hemp seed bread
hemp seed pain brioché

Coconut milk : I take big cans of thick milk, I chill and open to separate the floating cream and the skim milk. I don’t usually make it into butter to cook (and we can’t buy it here), but I sometimes clarify a small amount for cosmetic purposes.
The whole milk is very fat, too much for my gut, I make sure I use it diluted into sauces or in small amounts.
hot carobcinno
Café au lait, revisited
Coconut cauliflower creme soup

Butters, hard creams : I use mostly coconut cream. I sometimes buy cocoa butter but it’s a pricey rarity here. Both are perfect for chocolates, ganaches…
silky chocolate tarte
nama choco,vegan ganache sweets
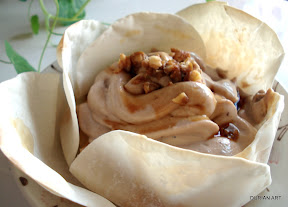
coconut cream vegan scones

The whip question :
Commercial soy based whip is convenient, but very chemical and not very tasty. Pure coconut cream whip is really too fat to digest. A solution is to mix half coconut cream and half of either tofu or some starched based cream when everything is at room temperature, and to whip in a bowl bathing in iced water.


TOFU
It exists in different textures, and you’ll get different results if you change.
DIY tofu

The silky tofu can become creamy if you whip it. Use it whipped instead of sour cream, cream cheese…
a vegan flower of marron cream
silky tofu cream
tofu pumpkin cake
tofu chi cakes, 3 flavors
shira-ae Japanese creamy dressing

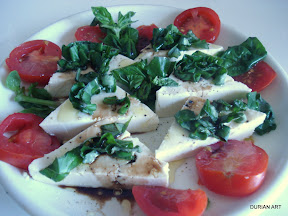
The medium soft tofu, particularly tasty hand-made can be served like fresh mozzarella, either cold, or topping a pizza (slice thin as it won’t spread much, drizzle olive oil and salt and bake).
tofu in Caprese salad
tofu on a pizza

The firm (cotton, momen-dofu) can be crumbled and salted to be like a cottage cheese, served cold. To get it more grainy, place it 20 minutes between 2 plates with something a bit heavy on top, so most water gets out.
silky tofu broken as fromage blanc cottage cheese
fromage de tofu (tofu cheez loaf)

Also in the tofu family :
Yuba : It is tofu skin. Fresh, it’s served like a cottage cheese. I buy it but you can make yours (it’s a bit long and tricky).
Okara : It’s the fiber you obtain when you make soy milk. Using it as a base for cake, you don’t need dairies.
cakes made with okara


OIL CAKE BAKING
To replace butter in cakes, cookies… Any oil can be used but you get different added flavors.
I find white sesame oil, the odorless cold pressed type, is excellent and very comparable to butter in taste in fine cakes. Almond oil has the same properties and brings an Oriental flavor.
White sesame oil chiffon cake
Bayonesa sweet pie with almond oil pastry
olive oil oatmeal scones
olive oil baked donuts


SESAME (and peanuts, etc)
Pasted sesame is a whole world. It’s the tahini of Middle-East and the neri goma of Asia. They are similar and they are not… If you paste raw or roasted sesame, if it’s white, yellow or black sesame, if you use a mortar or a mill, you get different flavors and textures. These tahinis are perfect to cream a sauce and replace butter as your fat spread. Sesame powder can also bring the “milk touch” to smoothies and soups.
DIY tahini
creamy sesame sauce for wine mandarin sauce tofu
DIY gomadofu sesame tofu (a creamy custard)
goma dare (Japanese sesame creamy dressing)

And as a butter alternative for baking :
tahini Venitian snails (not fully dairy free)
black sesame croissant pastry

Peanuts can also be used to cream sauces, make peanut butter, peanut tofu. Of course, there are possibilities for other types of seeds or nuts, but I don’t get them easily.
creamy peanut sauce on gado gado
*********************************************

TEXTURES :
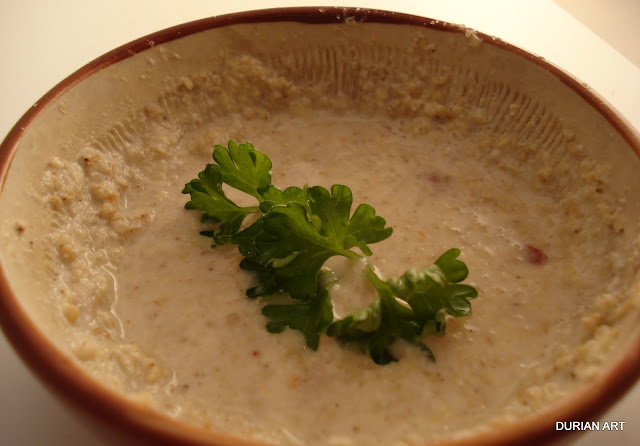
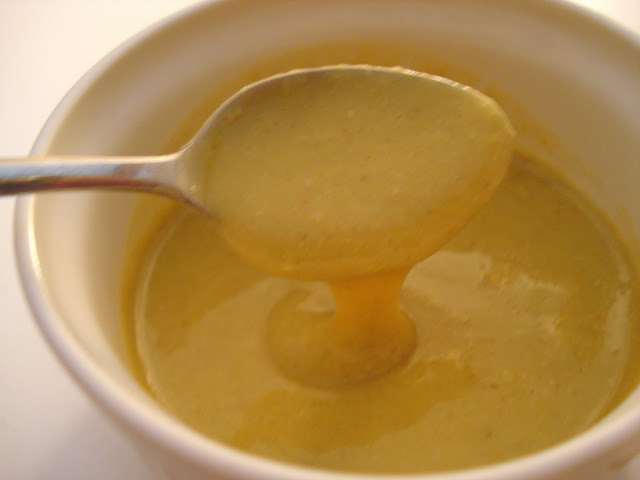
Millet : The upper photo shows a runny cheez sauce, nice for gratins and casseroles.

millet cheez on canneloni
millet cheez in tarragon gratin
millet cheez in moussaka

Mayonnaise
That sounds weird. Let’s be frank, if I were you reading this, I’d say “that’s gross…”. But I was given to eat mayonnaise pizza without knowing what it was, and it tasted good. It’s really much less heavy than what you expect. Even if the mayo is fat, you don’t put so much so the result is lighter than a classic cheeese pizza. So you can make your melted toasts with mayonnaise. Well I’ve tried with classic egg yolk mayo, but I think it would work with mayonnaise without egg, since the main ingredient is the oil.
Japanese pizza
Nattolita
Brown rice natto pizza

Others :
Some veggies have a sluggish texture (moloheya, nagaimo yam, etc…) and the most known is okra (gumbo) :
okra and coconut chizz chilled sauce
To make white sauces, corn starch, rice flours, powdered oatmeal are white and creamy.
Starch replaces the cream in ice-cream. Turkish ice-cream is based on arabic gum, and I’ve used kudzu to get a similar result.
Banana can give the creamy texture in ice-creams and smoothies.
Natural yummy banana pudding

*********************************

CHEEZESQUE FLAVORS :


Nutritional yeast is well know. I don’t think it’s a wonder on its own. I add a little amount to many savory cheez dishes, but I find it brings a weird taste to sweet dishes or in big amounts. I also adds salt, paprika, wheat germ, other spices.

The Japanese trinity :
Natto
Sake-kasu
Miso

Sake kasu is sake lees, a white paste of very fermented rice. The closest I know is goat cheese. Like natto, it’s not salted. It can be used to make a milky soup, and a milky drink. It can be grilled, and you get like a goat cheese melted toast.
Miso, the different types have that fermented flavor, but are extremely salty, so use by touch like very salty aged Holland or Parmesan cheese.

miso + sake kasu toast
miso + sake kasu dip
miso marinated tofu (bought version)
pide, Turkish pizza with grilled sake kasu

NATTO :

Fermented soy beans. It is like a strong French cheese already. It has the smell, the strong flavors, the slugglish factor… It’s a cheese, it’s the vegan cheese. Not some recreation. The only thing is it’s not salted.
Munsterious natto (the stinkiest)
black natto

Mango coconut restaurant millefeuille

Even if it’s not exactly restaurant grade for the shape, the freshness and the taste are here !

Yummmm…. fingerlickungud…
What make it a restaurant millefeuille is it’s prepared last minute, on the plate. The concept is different from the take out millefeuille, prepared advance by the baker. The plated version plays more on freshness.

Coconut milk and cream custard, vanilla flavored.

I’ve let it creamy and very soft.

A red mango, on sale because it’s super ripe.

Lots of fibers, but they are soft and it’s delicious, super fragrant.

Quick pastry dough.

Baked just before.

So let’s compose it : still hot pastry cookies, fresh coconut cream, mango cubes.

Finish touch : dry coconut flakes.

Thousand leaves, nearly classic millefeuille

Leaves of Autumn are not here yet, so let’s eat leaves of pastry…

Yes, this month’s it’s a millefeuille…

logo

Our October 2012 Daring Bakers’ challenge was hosted by Suz of Serenely Full. Suz challenged us to not only tackle buttery and flaky puff pastry, but then take it step further and create a sinfully delicious Mille Feuille dessert with it!

So I’ve made these vanilla ones, classic and also
Mango coconut millefeuille
And a while ago I made lemon ones :
Mille-citrons

Making pâte feuilletée…

The caramelized pastry, cut at the good size.

Vanilla crème with lots of vanilla powder and a hint of Grand Marnier.

Mmm… I need to train at piping the cream. That’s not pretty. Don’t watch that.

The icing is simply chocolate.

Recipe :

Source : the challenge

Pâte feuilletée /Puff Pastry

Servings: Makes 8-10 mille-feuille (yields: 675g pastry)

Ingredients
1¾ cup (250g) plain/all-purpose flour
Scant ¼ cup (55 ml) (1¾ oz)(50g) unsalted butter, chilled and cubed
1 teaspoon (5ml) (6 gm) salt
½ cup plus 2 tablespoons (5/8 cup)(150 ml) cold water

14 tablespoons (210 ml) (7 oz) (200g) butter (for the beurrage), room temperature
3½ tablespoons (55ml) (30g) plain flour (for the beurrage)

Additional flour for rolling/turning

Directions:

1. Cut the larger quantity of butter into smallish pieces and set aside at room temperature.
2. Put the larger quantity of flour into a bowl with the salt and the cold, cubed butter.
3. Lightly rub the butter and flour between your fingertips until it forms a mealy breadcrumb texture.
4. Add the cold water and bring together with a fork or spoon until the mixture starts to cohere and come away from the sides of the bowl.
5. As the dough begins to come together, you can use your hands to start kneading and incorporating all the remaining loose bits. If the dough’s a little dry, you can add a touch more water.
6. Knead for three minutes on a floured surface until the dough is smooth.
7. Wrap in clingfilm and refrigerate for at least 30 minutes.
8. While the dough is chilling, take your room temperature butter and mix with the smaller amount of plain flour until it forms a paste.
9. Place the butter paste between two sheets of clingfilm, and either with a rolling pin or your hands (I found hands easiest) shape it into a 4.5”/12cm square. You can use a ruler (or similar) to neaten the edges.
10. Refrigerate for about 10-15 minutes so the butter firms up slightly. If it’s still soft, leave it a bit longer. If it’s too hard and inflexible, leave it out to soften a touch. You want it to be solid but still malleable.
11. Once the dough has chilled, roll it out on a floured surface into a 6”/15cm square. Place the square of butter in the middle, with each corner touching the centre of the square’s sides (see photo below).
12. Fold each corner of dough over the butter so they meet the centre (you might have to stretch them a little) and it resembles an envelope, and seal up the edges with your fingers. You’ll be left with a little square parcel.
13. Turn the dough parcel over and tap the length of it with your rolling pan to flatten it slightly.
14. Keeping the work surface well floured, roll the dough carefully into a rectangle ¼ inch /6 mm in thickness.
15. With the longest side facing you, fold one third (on the right) inwards, so it’s covering the middle section, and ensure that it is lined up (see below).
16. Then, fold the remaining flap of dough (on the left) inwards, so you’re left with a narrow three-layered strip (see below).
17. Repeat steps 14, 15, 16.
18. Wrap up in clingfilm and chill for at least 30 minutes.
19. Repeat steps 14, 15, 16 twice.
20. Wrap up in clingfilm and chill again for at least 30 minutes.
21. Repeat steps 14, 15, 16 two final times.
22. Wrap up in clingfilm and refrigerate until needed. The dough keeps a couple of days in the fridge.

**************************
Pastry Cream / Crème Pâtissière:

(full batch; makes enough for 8-10 mille-feuille)

Ingredients

2 cups (450ml) whole milk
¼ cup (1¼ oz)(35 gm) cornflour/cornstarch
1 cup less 1 tablespoon (200gm) (7 oz) caster sugar
4 large egg yolks (if you’re making the royal icing, reserve two egg whites)
2 large eggs
¼ cup (2 oz) (60gm) unsalted butter, cubed
2 teaspoons (10 ml) vanilla essence

Directions:

1. Mix the cornflour/cornstarch with ½ cup of milk and stir until dissolved.
2. Heat the remaining milk in a saucepan with the sugar, dissolving the sugar and bringing the milk to the boil. Remove from heat.
3. Beat the whole eggs into the cornflour/milk mixture. Then beat in the egg yolks. Pour in 1/3 of the hot milk, stirring constantly to prevent the eggs from cooking.
4. Now, bring the remaining milk back to the boil, and add the eggy mixture, whisking as your pour. Keep whisking (don’t stop or it’ll solidify) on a medium heat until the mixture starts to thicken.
5. Remove the saucepan from the heat and thoroughly whisk the pastry cream. At this stage the pastry cream can look slightly lumpy, but a good whisking soon makes it smoother.
6. Beat in the butter and vanilla until fully incorporated.
7. If you haven’t already, pour the pastry cream into a stainless steel or ceramic bowl, and then place clingfilm over the surface to stop a skin forming.
8. Refrigerate overnight to give the pastry cream time to further thicken.

**************************

Mille-Feuille/ Napoleon/ Custard Slice

Servings: Makes 8- 10

Ingredients
1 x batch pâte feuilletée/puff pastry (see above)
1 x batch crème pâtissière/pastry cream (see above)

2 ¾ cups (660 ml) (12⅓oz) (350gm) icing sugar
2 teaspoons (10 ml) lemon juice
2 large egg whites
½ cup (2¾ oz) (80gm) dark chocolate

Directions:

1. Preheat oven to moderately hot 200 °C /400°F/gas mark 6.
2. Lightly dust your work space with flour and remove your dough from the fridge.
3. Roll into a large rectangle, the thickness of cardboard. The recipe I followed specified no other dimensions, but I rolled mine to about 12”/30cm x 18”/46cm.
4. Cut into three equal pieces and place on a baking tray. If you don’t have space for all three, you can bake them separately.
5. Prick the pastry sheets all over with a fork.
6. Place another sheet of greaseproof paper over the top and then a heavy baking tray. This will prevent the layers from puffing up too much.
7. Bake each sheet for about 25 minutes in a moderately hot oven 200 °C /400°F/gas mark 6, removing the top layer of greaseproof paper/tray 10 minutes before the end for the tops to brown. Keep an eye on them and lower the temperature if you think they’re browning too much.
8. Remove the baked sheets from the oven and leave on a wire rack to cool.
9. Once the pastry has cooled, you’re ready to assemble your mille-feuille. Get a sturdy flat board, your pastry and the chilled crème pâtissière from the fridge.
10. Lay one sheet on the board and spread half the crème patisserie evenly over the top.
11. Take the second sheet and place it on top, pressing down lightly with your hands to ensure that it sticks to the filling.
12. Spread the remaining crème pâtissière and place the last sheet of pastry on top, pressing down again. (Don’t worry if there’s some oozing at the sides. That can be neatened later.)
13. Pop in the fridge while you prepare the icing / chocolate.
14. Melt the chocolate in a bain marie, stirring periodically. Once melted, transfer to a piping bag (or plastic bag with end snipped), resting nozzle side down in a glass or other tall container.
15. To make the icing, whisk 2 egg whites with 2 teaspoons lemon juice until lightly frothy.
16. Whisk in about (2 cups) 300gm of the icing sugar on a low setting until smooth and combined. The mixture should be thick enough to leave trails on the surface. If it’s too thin, whisk in a bit more icing sugar.
17. Once ready, immediately pour over the top of the mille-feuille and spread evenly. I found that I didn’t quite need all of the icing.
18. Still working quickly, pipe a row of thin chocolate lines along the widest length of your pastry sheet (see below). You can make them as far apart/close together as you like.
19. STILL working quickly (phew), take a sharp knife and lightly draw it down (from top to bottom) through the rows of chocolate. A centimeter (½ inch) or so further across, draw the knife up the way this time, from bottom to top. Move along, draw it down again. Then up. And so on, moving along the rows of chocolate until the top is covered in a pretty swirly pattern.
20. Once you’ve decorated your mille-feuille (no doubt far more beautifully than I did), with a clean knife mark out where you’re going to cut your slices, depending on how big you want them to be and leaving space to trim the edges. I got ten out of mine – two rows of five.
21. Chill for a couple of hours to give the icing (etc.) time to set.
22. With a sharp knife, trim the edges and cut your slices.
23. Dig in!

Eating like a queen : bouchée à la reine

Une bouchée à la reine. That means “A bite for the queen”. That’s a specialty from my native Lorraine.
Once upon a time, the duke of Lorraine married his daughter Marie Leczinska to the king of France. So she became Queen, and France became a region of Lorraine. The legend says that her cooks have invented nearly all the good recipes of French cuisine.

An old fashion creamy chicken and mushroom white stew.

That would be easier to serve it with a few fleurons (pie biscuits). But I like having my “bouchée” perfectly shaped. Well, perfectly or artistically… It’s one of it kind :